by Bernie Ruckdaeschel
Tomatoes are loved by most gardeners. At James Park Community Gardens there are very few plots which have no tomato plants. However, this fact can present a problem if the plants are not properly cared for, like: garden hygiene, proper air circulation, watering, mulching, and fertilizing. For this reason I have changed my approach to raise tomato plants.
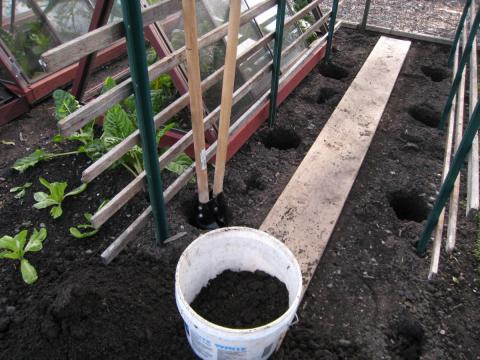
The tomato plant is a vine, and rather than using tomato cages I use a trellis system. I use three 6' green metal fence posts which I drive 46" apart into the ground just past the twist plate. I then attach 7 wooden furring strips with rounded edges to the pre-drilled holes of the fence posts. With a post hole digger I dig from the end of the trellis at 16", 32" and 48" a 10" deep hole to plant the tomatoes. I mix part of the excavated soil with compost, one cup of bone meal and one cup of green sand. Depending on the size of the tomato plant I remove one or two leaves from the bottom of the plant and along with the tomato plant I place a 3/4" dia. x 15" long "watering" pipe. I purchased a 3/4"x5' CPVC pipe, cut it into four 15" long pieces and drilled ten 1/2 dia. holes at 90 deg through the pipe.
I plant the tomato with the leaf removed area below ground level in order to produce more roots for a more vigorous plant. As the plant grows I remove the first two suckers and allow the next two side shoots to grow into main branches of the plant. As the plant grows I weave the new growth through the trellis and, if required, I use cotton strips (from old bed sheets) to tie down the branches. Starting the middle of August I remove all new growth to direct the plant's energy into fruit production.
I water the plant through the plastic pipe with weed tea or water. I don't water at ground level. During long dry spells I use a hose sprayer filled with compost tea, weed tea, or seaweed emulsion to give the leaves a light spray, early in the morning, to make sure the leaves are dry within one hour.
Why all this fuss?
Tomato plants are prone to fungus disease. Septoria leaf spot is indeed the culprit of tomato woes. The spores are spread by wind and rain and the infection is first noticeable as a small water soaked spot at the lower leaf of the plant after fruit set. The spots enlarge to a uniform size of 1/16" to 1/4" dia; they have dark brown borders and a tan colored center. If left untreated, by early July the lower third of the plant is affected with the bottom leaves being brown and dead causing smaller fruit.
Fungicides, organic or not, have shown limited results with Septoria leaf spot. Copper solution spray may help to control the disease but it is not a 100% solution. Also, copper will accumulate in the soil and toxicity may result in reduced fruit set and in extreme conditions may even kill the plant. If copper fungicide is used, it must be applied as soon as fruit set occurs and every 7-10 days thereafter because of plant growth and weather conditions. Before using copper spray consider that beneficial insects will be harmed.
Copper is more toxic to plants in acidic soil conditions and more effective against disease under higher pH conditions, therefore proper pH soil levels are important to plant health. Extensive use of copper fungicide will seriously reduce all soil life and even kill large earth worms. It also suppresses rates of nitrogen fixation by the bacteria and kills naturally occurring microorganisms on leaves. Septoria spores can also be present in the soil on old decomposing tomato leaves, therefore a four-year crop rotation is highly recommended.
As soon as Septoria symptoms appear on the tomato leaves carefully remove the leaf using a pair of scissors cleaned with rubbing alcohol. Place the leaf in a plastic bag and dispose it in your city garbage container. Do NOT place the leaf on your compost heap. Stay out of growing areas when leaves are wet including morning dew. Check your garden for ground cherry plants, black nightshade and jimson weed as they are also prone to Septoria and may contaminate your tomato plants.
MULCH
Bare soil produces early mature vegetables; however, fruit quality is lower. Plants are stressed during prolonged dry spells.
Plants that are set in mulch produce edible fruit two plus weeks later and are less stressed during dry spells. Fruit quality and size is better.
The ideal condition is to let plants establish on bare ground that was permitted to absorb warmth and then apply mulch.
Types of mulch: Hay and straw are preferred, but ground-up corncobs, wood chips, aged sawdust (add some form of nitrogen when using them!); shredded leaves, shredded newspaper (chemical leaching), coco bean shells (luring wild life). Whatever is used, I add it first between the planting rows and then draw it closer to the plants.
USING YESTERDAY'S WAYS TO STOP TODAY'S BUGS
based on “The Best Gardening Ideas I Know” by Robert Rodale, Editor of Organic Gardening and Farming Magazine
- Tansy keeps ants out of the house and keep Japanese beetles off raspberries, blueberries and grapes.
- Wood ashes or ground rock sprinkled around the plant will stop squash borers, cucumber beetles and potato bugs.
- Molasses diluted in 50 parts of water and spray.
- Green shallot onions ground in a food blender and equal amounts of water along with a teaspoon of plain dishwashing detergent (wetting agent).
- Garlic ground-up, add wetting agent and spray.
- Elder leaves decoction with warm water will repel worms, caterpillars, aphids and blight canker.
- Trichogramma wasps
- Basil helps tomatoes overcome insect and disease. Set seedlings in rows about a foot apart alongside tomato plants.
- All mint varieties protect the whole cabbage family (broccoli, cauliflower, Brussel sprouts, etc.)
- The bitter blue-green Rue is very offensive to pests.
- Marigold is the most beneficial plant discouraging nematodes to attack potatoes, strawberries, roses and Mexican bean beetles.
- Nasturtium does a good job chasing pests from melons, squashes and cucumbers.
- Garlic or Chives planted among raspberries, grapevines and roses keeps Japanese beetles at a distance. Or garlic extract diluted 1:10 as bug spray.
- Leaves of lettuce, spinach or cabbage and cut raw potatoes spread overnight along the vegetable rows will gather slugs, snails, cutworms and grubs for picking up early in the morning at sunrise. Also, a wooden board can be used and the pests will gather underneath.
- Beer poured in a shallow pie tin to a depth of 2" will attract pests.
- Japanese Beetle Traps from Garden's Alive does a good job collecting Japanese bean beetles.
- Bone Meal is not only a good fertilizer, but also a repellent of insects and rabbits.
- Aluminum foil is both a mulching material as it retains moisture in the ground and reflects an extra dose of light to the plants. It also repels aphids. When aphids decide to fly they head directly to the sky and upon their return they get confused from the reflection of the foil. Consequently, they constantly reverse flight, get tired and drop to the ground. This method only works for plants up to 12" high. For larger plants a structure has to be created; use insulation paper backed aluminum foil.
Another good source for natural pest control is www.planetnatural.com.
Neemking.org per Outdoors and Garden recommends Neem Oil for pest control.
Neem Oil is derived from neem tree leaves growing in tropical to subtropical climates.
Neem oil as pest control will not work for :
snails - use stale beer;
cockroaches - use boric acid;
bed bugs - use Diatomaceous earth;
ants - use tea tree oil.
Neem oil, if sprayed before sunrise or after sunset on a weekly basis supposedly will not affect bees, lady beetles and other predators or parasitic wasps. However, since it is an oil any beneficial predators which are still hiding on the plant could be suffocated by the oil spray.
Neem oil effects on plant eating bugs or insects: it enters the body of the pest and blocks the insect's hormones from working properly. They stop feeding, mating or stop laying eggs. If eggs are produced they don't hatch or the larvae does not molt.
Neem oil concentration: 0.5% - 2%
It is simple, more effective and cheaper in the long run to make one's own neem oil spray. 100% cold pressed pure organic neem oil, also called raw or crude neem oil can be purchased at www.neemking.org. The oil is colored, cloudy and very smelly (a kind of sulfurous, nutty, garlic smell).
Neemaura Naturals Neem Seed Oil - 16 oz. $20.49,
or neem oil for the garden - 16 oz. $19.88.
For a 1 gallon spray there are three choices depending on severity of infestation
- For a 0.5% concentration use 4 tsp neem oil (approx. 2/3 oz.).
- For a 1.0% concentration use 8 tsp neem oil (approx. 1.3 oz.); and
- for a 2.0% concentration use 15 tsp neem oil (approx. 2.5 oz).
Use 1 tsp of eco-friendly dish detergent, or for neem oil soap emulsifier use 1 bar (5.3 oz.) and 1 gallon hot water. Cut the soap bar into smaller pieces to get it through the bottle neck and leave it to dissolve overnight. Shake the diluted soap mixture and use 1 cup per gallon of water. Make sure that the neem oil is properly disbursed in the water after your spray is ready. If parts of neem oil still float on top, add a little more dish soap or emulsion of your choice.
What will be our role in the garden?
In 1962 Rachel Carson wrote the book Silent Spring making us aware that synthetic insecticides are destroying the balance in nature. At that time 143 mil pounds of insecticides were used per year by the United States agriculture. By 1970 it had increased to 500 mil pounds per year. DDT was the cure for all our insect problems, or so we thought at the time. We must proceed to master our environment. But, perhaps, our perspective is the clearest of all. As a gardener or farmer plants and animals are our intimates. How do YOU feel about them?
The tiny flea beetle may seem insignificant and a chemical spray will make him disappear for a time. But, countless of such creatures play roles in even the most modest of backyard plots; everything in nature is interrelated. The balance in our garden is dependent on a cycle and each part of this cycle is dependent on the other. Knock out any one element, such as the balance of pests and beneficial insects, and the garden is in trouble.
Let's look at this cycle. It starts with life and death found in compost mulch. It is a natural soil enrichment and produces strong, healthy plants which harbor a balance of good and bad insects. These in turn depend on a humus rich soil. Following this cycle in our garden we are rewarded not only with the fruits of our labor, but also spiritually by being a part of the cycle of life.
Fertilizer per "The Best Gardening Ideas I Know" by Robert Rodale, Editor of Organic Gardening and Farming Magazine
The worst error we make is to give the plant too much nitrogen. Aphids respond positively to increased elements, particularly to nitrogen. Too much nitrogen on tomato plants and they will drop blossoms without setting fruit. We can check the nitrogen level in the soil by looking at the plant stem and foliage growth at the cost of fruiting. Composted plant waste and manure will fill the need of nitrogen in the soil and so will legumes, like clover, alfalfa, soybeans, fava beans by nitrogen fixing bacteria on their root nodules. In addition, there are other bacteria occurring free in the soil that extract nitrogen from the air. The dead bodies of earth worms, nematodes, mites, snails, millipedes, centipedes and their excreta will add nitrogen proteins to the soil.
Phosphorus has been called the master key to agriculture because low crop production is due more often to the lack of this mineral than any other. Lack of this element shows in leaf color. Corn and small grains will show leaves with a purplish tint and legumes become bluish green with stunted growth. But most plants develop stark green leaves with a tendency to develop reddish and purple colors. Too much or too little of this element can increase egg production of spider mites and a deficiency leads to problems with white flies. Good sources of phosphorus are: rock phosphate which contains 30-50% phosphorus; bone meal, dried blood, cottonseed and soybean meal.
Magnesium
A deficiency of this element will show in yellowing, bronzing, reddening and death of older leaves which then drop. Mites thrive under such conditions. A soil test may indicate available magnesium but too much potassium can block the uptake of it. I avoid commercial chemical fertilizers which are high in potassium.
Deficiency of other important elements will show up as follows:
Sulfur — yellowing of the youngest leaves and finally a yellowing of all leaves, referred to as chlorosis.
Iron — chlorosis of new leaves at the growing tip of the plant.
Manganese — same as iron deficiency followed by death of most or all leaves. Most manganese deficiency occurs in neutral or alkaline soil.
Copper — leaves at the stem tip will wilt without recovering overnight or during cloudy weather.
Boron — dying of the growing tips of the plant stem; internal cork in apples; bitter taste of cauliflower and cracked leaf stalk in celery.
Information on compost tea can be found at www.thermalcomposting.worldpress.com/micro-herders.
The Oregon State University Extension Service provides plans on how to make a 25-gallon compost tea brewer. www.extension.oregonstate.edu/lane/horticulture/documents/25-galloncompo...
PESTS
based on "The Best Gardening Ideas I Know" by Robert Rodale, Editor of Organic Gardening and Farming Magazine
Flea beetles are the most difficult to manage pest of eggplant and cole crops and seedlings of tomatoes, potatoes, peppers, turnips, radishes and corn. Symptoms of flea beetle feeding are small roundish irregular holes in large numbers. They are the transmitter of potato blight and bacterial wilt of corn. The larva feed on plant roots.
The flea beetles pass the winter in adult state and emerge in spring feeding on weeds and then switching to the first leaves (cotyledons) of seedlings and transplants. Flea beetles are favored by stable warm spring weather and hampered by alternating periods of hot and cold temperatures and infrequent rain.
Flea beetles like to feed on stressed plants, therefore, providing good nutrition and favorable growing conditions will help plants to survive flea beetle attacks. Catnip and Mexican marigold planted in borders deters flea beetles.
There is an excellent article on organic flea beetle control options at www.attra.ncat.org
COVER CROPS
per GardensAlive.com
Buckwheat — 1.5 lbs./500 sft. Sow in late spring or summer.
Taproots break down clay soil. It blooms in 30-40 days providing food for bees. It extracts phosphates from the soil and returns it to humus after decomposing. Buckwheat grows in poor soil.
Canola — 1 lbs/500 sft. Sow in spring or fall.
This fast growing cabbage relative will add a good amount of humus when tilled under. It has deep roots which loosens clay soil,
Winter Rye — 1.5 lbs./500 sft. Sow in fall.
Winter rye will sprout in 32 deg. F and is hardy down to -40 deg. F. When tilled under it reduces seed germination making it the best weed suppression cover crop. Turn under in spring before seed heads develop.
Hairy Vetch — 1 lb./500 sft. Sow in spring or fall.
Hairy vetch is winter hardy. It's leaves are higher in nitrogen than other legumes.
I seed small areas in the garden or along the border with buckwheat, canola, and hairy vetch in spring to enrich the soil and let the blossoms feed our pollinators. After blooming I harvest the cover crops for my compost pile by cutting the tops off the plant at soil level. I break up the root structure of the plants with my garden claw to assist the decomposition to enrich the soil and make it ready for the winter rye fall cover crop planting.
The garden starts with healthy seeds according to High Mowing Organic Seed Company
High Mowing Organic Seed Company recommends placing seeds in 118 deg F (47 deg C) hot water for 20-25 minutes to kill the majority of bacterial and fungal pathogens.
I drain the hot water and then soak seeds in cold water until they puff up and pick thickest ones for seeding. I start the seeds in an organic, sterile seed starting mix (greenhouse quality) and the 4-count plastic trays. After the seedlings have 4-5 true leaves I transplant them in 3" Jiffy pots; for tomatoes I use 4" Jiffy pots.
Cleanliness
per Jerry Baker
Mix one part of bleach with 10 parts of water and, using a garden sprayer, spray all trellises, tomato cages or any support structure including the raised bed frames that comes in contact with the plants.
Garden Clean-Up.
1 c mouthwash, 1 c dish soap (environmentally friendly), 1 c tobacco juice. Spray garden soil.
Tobacco Juice.
Place 1/2 handful of chewing tobacco into an old nylon stocking and immerse in a gallon of hot water until the mixture is dark brown. Label the container and use if the spray calls for it.
Tomato Black Spot.
- 1 T dishwashing detergent
- 1 T baking soda
- 1 T light vegetable or canola oil
- 1 gallon of warm water
Tomato Blight.
1 T bleach
1 qt warm water
spray over 100 sqf of garden as soon as the soil temperature is above 50 deg F, and when buds form
spray with
1 part skim milk
1 part anti transpirant (wilt proof)
9 parts of warm water
Spring Soil Preparation.
-
- 1 can beer
- 1 can regular coke
- 1 c mouthwash
- 1 c dish soap
- 1/4 t instant tea
- spray with a hose sprayer until soil run-off. Spray again one week later.
www.gardeningwithnature.net has a wealth of gardening information.
THE LOVE OF GARDENING AND A KEEN OBSERVATION ARE THE BASIS OF A REWARDING GARDENING EXPERIENCE AND A HEALTHY GARDEN.
My gardening knowledge was greatly enhanced by "The Best Gardening Ideas I know" by Robert Rodale, Editor of Organic Gardening and Farming Magazine published in 1977 by Rodale Press, Inc.